Elevate Your Place: A Guidebook to Portray Your Garage
Painting the Garage
Introduction
Your garage, generally an ignored Place, retains the opportunity being extra than just a utilitarian storage place. Which has a fresh coat of paint, you are able to change it into an organized, aesthetically pleasing extension of your home. This guidebook will stroll you through the actions to painting your garage, from planning to ending touches, that can assist you develop a space which is each functional and visually pleasing.
Step 1: Organizing and Preparation
Before you begin, Assemble the following products:
Paint (choose a superior-good quality paint well suited for the garage surroundings)
Primer (if desired)
Brushes and rollers
Painter's tape
Fall cloths or plastic sheeting
Sandpaper or maybe a sander
Cleansing materials (e.g., degreaser, cleaning soap, water)
Steps:
Very clear the Place: Eliminate all items from your garage. This includes vehicles, instruments, and any stored possessions. This will give you enough home to operate.
Cleanse and Restore Surfaces: Sweep the floors, walls, and ceiling to remove dust and debris. If you will discover oil stains, utilize a degreaser to clean them. Fill any cracks or holes while in the partitions with spackle and sand them easy.
Guard Surfaces: Address the floors with fall cloths or plastic sheeting to avoid paint splatters. Use painter's tape to mask off locations you do not need to paint, such as windows, doorway frames, and electrical stores.
Prime (if needed): For anyone who is painting over a dim or uneven surface area, making use of a coat of primer may also help guarantee better paint adhesion and protection.
Phase two: Picking out the Appropriate Paint
Think about the next aspects when picking paint:
Form of Surface area: Different surfaces (concrete, wood, metal) might have to have particular sorts of paint.
Finish: For garage partitions, a satin or eggshell complete is usually recommended for its sturdiness and ease of cleansing. For floors, take into consideration epoxy or specialised garage floor paint for max durability.
Coloration: Lighter hues can assist brighten the space, while darker hues may perhaps demonstrate significantly less Filth and use.
Ventilation: Go for very low-VOC or no-VOC paint to reduce fumes, particularly if ventilation is proscribed.
Step 3: Implementing the Paint
This is tips on how to tackle Each individual area:
Partitions:
Utilize a higher-top quality brush to chop in about edges and corners.
Make use of a боя за баня против мухъл roller to protect more substantial locations. Start out from the leading and do the job your way down for even coverage.
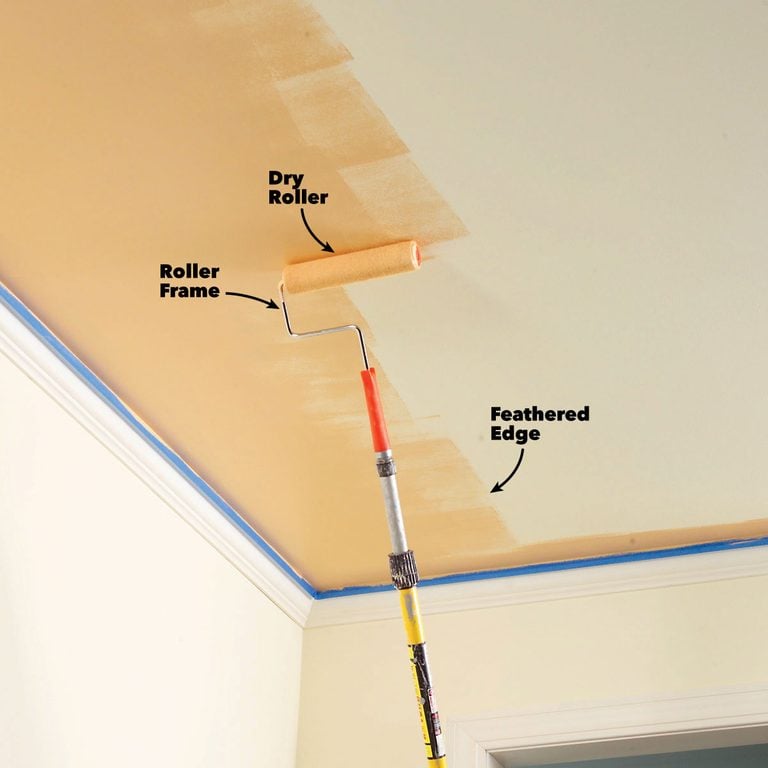
Ceiling:
If your ceiling desires painting, use an extension pole to reach substantial locations.
Use paint in extended, even strokes.
Floors:
Clean up and degrease the ground before implementing paint.
Stick to the manufacturer's instructions for application. Epoxy may require various coats.
Allow for Drying Time:
Stick to the recommended drying situations in between coats. Right drying makes certain a durable finish.
Phase four: Ending Touches
Inspect Your Work: As soon as the paint is dry, thoroughly inspect the surfaces for virtually any skipped spots or uneven coverage.
Clear away Masking Tape: Carefully get rid of painter's tape at a 45-diploma angle to avoid pulling off any new paint.
Reassemble the Garage: When the paint is completely dry, return objects towards the garage within an organized manner.
Conclusion: Appreciate Your Remodeled House
Having a contemporary coat of paint, your garage has the probable to be a functional, organized, and visually desirable extension of your private home. Choose pleasure in your recently transformed Room and revel in some great benefits of a thoroughly clean, brilliant, and inviting garage.